About the FastSum user interface
The FastSum user interface is designed to provide an easy access to applications features. The major actions are embodied in two different ways allowing you to choose your own handiest one.
The following sections include a description of each user interface component, as well as links to more information about using each component.
Application Main Window
The main window contains four major areas:
Menu and toolbar
The toolbar is located at the top of the main window, under the menu bar, and contains shortcut buttons to commonly used tasks and features.
Workspace
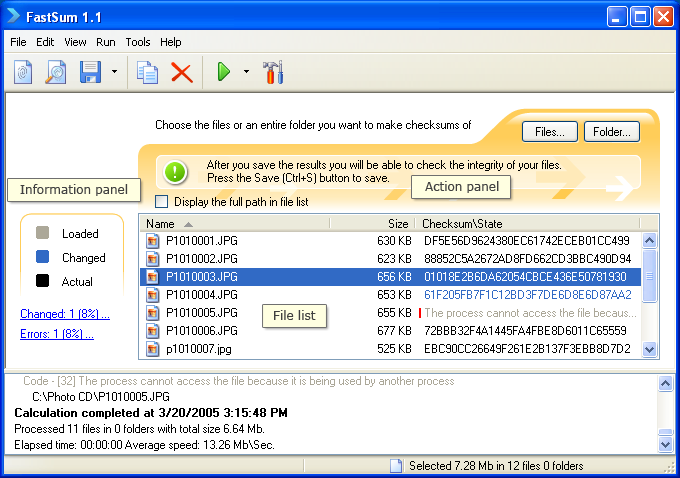
The Workspace is located below the toolbar and contains an Action panel, Information panel and Files list. You can easily create your first checksums by following the tips shown on the Action panel. Figure 1 shows workspace layout.
Please note that for a large amount of files you better use Calculation and Verification Wizards, they are specially optimized for it.

Figure 1. Main application window workspace
Action panel
The Action panel consists of two action buttons and shows the hints to make your first checksum creation easier. You can select files and entire folders you want to make checksums of or verify previously created checksums.
| Files... | Opens standard Open dialog to selects files you want to make checksums of or verify previously created checksums. |
| Folders... | Open Browse for Folder dialog to select a folder. Files in the subfolders are not included. |
The hints under the buttons will walk you through the steps necessary to complete your first checksums calculation.
File list
File list displays a list of files, their size and actual or loaded checksums. You can add files which need to be processed by clicking Files or Folder buttons at the Action panel, copy checksum values to clipboard by clicking Copy button from the toolbar or delete files from the list by Delete button.
Also file list has a context menu with a common commands that will be operable by right-chicking the list.
Information panel
The Information panel displays a color map of the checksums displayed in the File list and reflects changes, count of first made checksums and possible file access errors.
File list color map and underlined areas
| Loaded | If the selected files have previously stored checksums they are loaded automatically when you add these files to the File list. Loaded values are highlighted in Loaded color and have no underlined area. |
| Changed | When you have completed the calculation process by clicking the Run (F9) button, actual checksums will be compared with loaded if they were saved before. Changed items are shown highlighted at the File list and will be summarized as underlined area at the Information panel. |
| New | If selected files have no previously stored checksums, after the calculation they count as New files. There are no special color markings for them but they appear as an underlined area in the summary. |
| Errors | Files with access error detected have a special marking - a vertical red stripe in the Checksum\State column, they also are reflected as an underlined area. |
You can click any of the underlined areas to see the details in a separate dialog.
Status bar
The Status bar is located at the bottom of the Browser window and displays information about selected folders or files.
Log-file viewer
This view shows all events occurred during the calculation. If you wish you can copy the contents to clipboard, save it as a text file or clear the log messages by choosing from context menu.